Chapter 3: Write your own melody, then sing it
Chapter 3 Introduction
In this chapter, you’ll practice writing down melodies, then singing that music out loud. Although you may want to play your melodies on an instrument first, most Aural Skills courses emphasize students singing. If you’ve never sung before or are uncomfortable singing, don’t panic. Your instructor can give you specific tips and techniques as well as ideas for how to practice.
The purpose of writing and then singing is to help you develop a link between music notation and sound. By writing your own melodies, you’ll also be practicing using music notation. You can write your own melodies using blank staff paper or music notation software. If you choose to use music notation software, make sure to mute the sound. If the notation software plays the sound of your melody for you, it will defeat the purpose of the exercise!
In addition to writing and singing your melodies, you will get some additional practice using conducting patterns. Don’t worry about coming up with melodies that sound good or are creative.
Chapter 3 Challenge – Writing your own music
You may already be a composer, singer-songwriter, or creator of music. Chances are you’ve made a recording of your ideas or performances. Or, you may be totally new to writing your own music. You can start from anywhere: it’s ok to write complex melodies if you need more challenge or simpler melodies of two or three notes if you need less challenge. In your musical career, it’s very likely that at some point, you’ll have the need to write your own music, whether it’s an original melody, a transcription, or an arrangement.
Chapter 3 Goals
By the end of this chapter, you should be able to:
- Write rhythms in simple and compound meters
- Read and perform simple rhythms
- Write melodic and harmonic intervals
- Read and sing short, simple melodies
- Clearly conduct duple, triple, and quadruple meters at a range of tempos
Chapter 3 Vocabulary
Audiation – The process of imagining sound without hearing it or humming it first
Melodic contour – The melodic contour is the shape of the melody. As a melody ascends in pitch, the contour goes up. As a melody descends in pitch, the contour goes down.
Solfege – Syllables used to label pitches. This tradition originated as a pedagogical device invented by Guido. The syllables, originally Ut, Re, Mi, Fa, Sol, La, come from the initial syllable of each line of Ut queant laxis, an Ambrosian hymn to St. John the Baptist. Since Ut is the only syllable in the collection ending on a hard consonance, it was eventually replaced by the syllable Do (from Domine -Latin-“Lord”) to facilitate singing. In the 15th-century a seventh tone and syllable was added, Si, an acronym for Sancte Ioannes, the last two words from Ut queant laxis,. This became the syllable Ti in 19th-century English sol-fa. The inclusion of the syllable Ti is attributed to Sarah Glover. Ti was substituted for Si so that each solfége syllable would begin on a differing consonant. (Solfege definition adapted directly from Pitch notation – Music Theory (LibreTexts) under CC BY NC SA 3.0 license)
Syncopation – A syncopation or syncopated rhythm is any rhythm that puts an emphasis on a beat, or a subdivision of a beat, that is not usually emphasized.
Tonic – A scale starts with the note that names the key. This note is the tonal center of that key, the note where music in that key feels “at rest”. It is also called the tonic, and it’s the “do” in “do-re-mi”.
Definitions adopted from “Understanding Basic Music Theory” by Catherine Schmidt-Jones, 2013. CC-BY
Section 3.1 – Writing and clapping rhythms
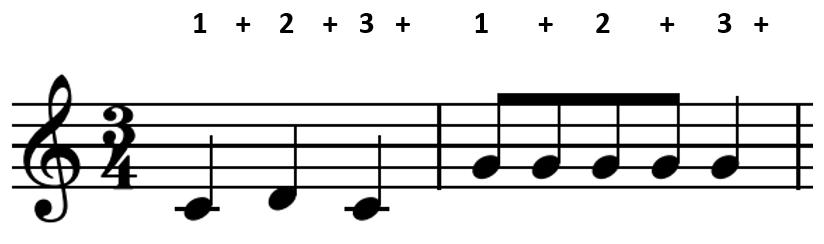
Before you create full melodies, start by writing and clapping rhythms. Although this text uses the word “clap”, you can tap your fingers or toes, vocalize, or find some other way to make rhythmic sound. Similarly, you can write your rhythms on paper or using music notation software with the sound turned off. After reviewing example 3.1.1, try writing your own. Start by making up a simple rhythm. You can start with something complex but there’s no need to rush. Then, write your rhythm on the staff. Next, read through your rhythm, using audiation to imagine the sound of the rhythm. Last, count a measure of silence and then try clapping your rhythm. Example 3.1.1 has been completed for you as an illustration.
Example 3.1.1 – created by Alex DiCicco, public domain
Section 3.2 – Writing and singing intervals
Melodies are usually made up of more than one pitch. The distance (or difference) between one pitch and another is called an interval. When those pitches sound together, it is a harmonic interval. When the pitches sound in sequence, it is a melodic interval. An ascending melodic interval is the distance between a pitch and a second, higher-sounding pitch. A descending melodic interval is the distance between a pitch and a second, lower-sounding pitch. Although melodies can be incredibly complex, there are three basic melodic intervals between two notes: unison (second pitch is the same as the first), ascending (second pitch is higher than the first), or descending (second pitch is lower than the first).
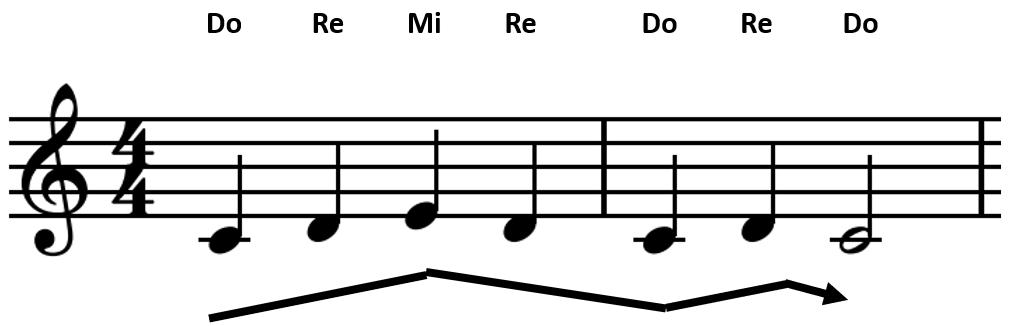
After reviewing example 3.2.1, try writing several short, simple, tonic melodies. You can warm up your voice with some simple vocal exercises. Then, try singing a major scale a few times. Pick a few notes to play with and create a short, simple melody. Two or three notes is plenty. Next, write your melody on blank staff paper or using notation software with the sound turned off. Then, try using audiation to imagine the sound of the melody before singing it. Finally, try singing your melody out loud. Example 3.2.1 has been completed for you as an illustration.
Example 3.2.1 – created by Alex DiCicco, public domain
Section 3.3 – Conducting while singing (part 1 of 2)
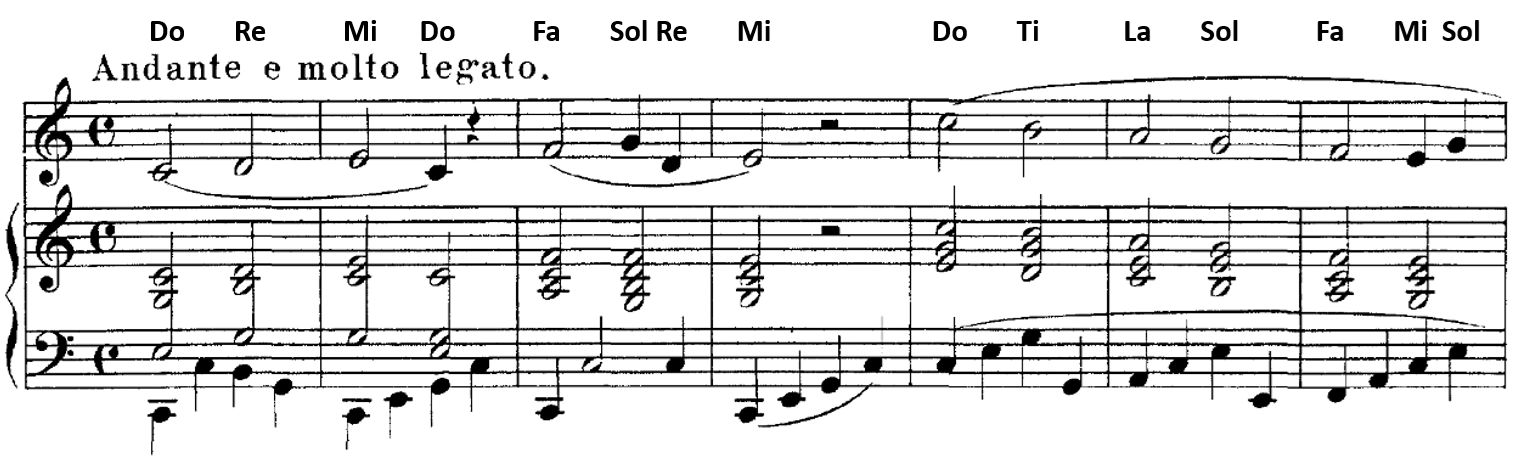
In this section, you’ll practice using conducing patterns while singing along with notated music. It can be very helpful to rewrite the melody on blank staff paper or using music notation software. For these examples, you can play the melodies a few times on your primary instrument first or ask your instructor to play them for you. Start by adding the solfege syllables to the score and saying them out loud without singing them. Once that’s confident, try singing the syllables. Next, imagine the sound of the melody while following the score. Then, conduct while following the score. You can count along in your imagination.
After you’ve practice the melody silently and the conducting pattern, try rehearsing both at the same time. Go slowly, giving yourself plenty of time to match the solfege syllable to the correct pitch. Finally, count a measure of silence and then sing the example while conducting. Example 3.3.1 has been completed for you as an illustration.
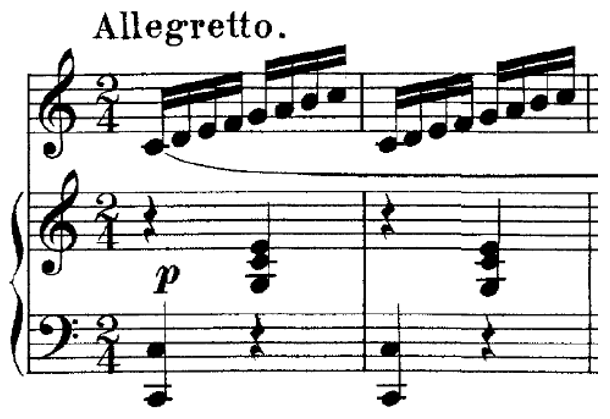
Example 3.3.1 – No.2 from 24 Vocalises by Mathilde Marchesi
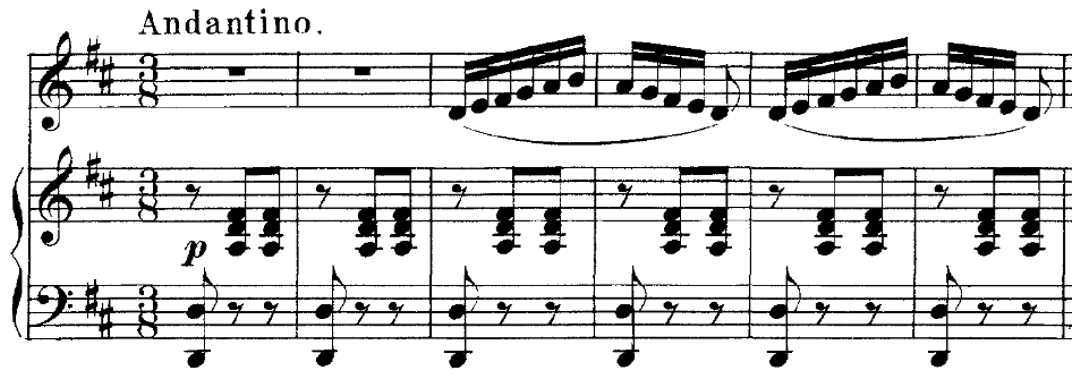
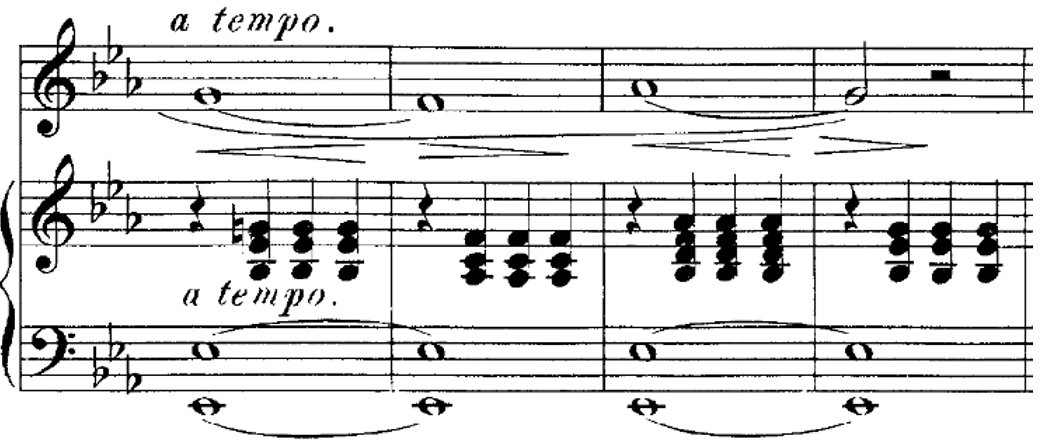
Example 3.3.2 – No. 6 from 24 Vocalises by Mathilde Marchesi
As the first step, write the solfege syllables above the melody.
Example 3.3.3 – No. 7 from 24 Vocalises by Mathilde Marchesi
As the first step, write the solfege syllables above the melody.
Example 3.3.4 – No. 5 24 Vocalises by Mathilde Marchesi
As the first step, write the solfege syllables above the melody.

Example 3.3.5 – No. 3 from 24 Vocalises by Mathilde Marchesi
As the first step, write the solfege syllables above the melody.
Practice check in
Take a moment to reflect on how your out-of-class practice is going. You can compare it to what you wrote or recorded at the start of the semester.
Next, take a moment to reflect and write about how you are using the feedback you’ve received from your instructor, mentor, or helpful friend. What have they suggested? Have you tried it? How did it go?
Curwen-Glover solfege hand signs
Some instructors like to use the Curwen-Glover hand signs to quickly and clearly communicate solfege syllables. There is one hand sign for each of the seven diatonic solfege syllables. A chart can be found in Part II, Section A of this text. Review the chart, then practice your hand signs using the activity below.
